Adventures in Cooking – Week 3

Well, this week’s experiment was disappointing and a big lesson on a cooking method that I will never try again…frying. What could make me detest something that provides such scrumptious treats as funnel cake, doughnuts, and fried turkey? My apartment and my clothes smelled like a fast-food restaurant for two whole days! If any of you have worked at a fast-food joint you know exactly what I’m talking about. Your hair smells like grease, your coat smells like grease, everything smells like grease and it’s gross.

Now that I’m done with my rant on how much I now detest frying foods, I should probably get to the actual recipe. I will occasionally catch an episode or two of Chow Ciao! on shine.yahoo.com because he makes everything look so easy and delicious. A recipe for Ricotta Fritters caught my eye and so I decided that this week I would make these simple snacks for a friend’s birthday party. Let’s just say that the first attempt went straight into the trash can; not because the recipe itself wasn’t good, but because I made a couple of substitutions that did not work out well (fyi, extra-virgin olive oil should never be used for frying). Never one to let an unsuccessful attempt get me down, I decided that on my second try I would use a different recipe for ricotta fritters. Ugh, they turned out more like dense doughnut balls that, again, went into the trash can. I’ll post the recipe for the original batch that I made, since the second one was a big disappointment. I honestly think that this recipe could turn out very well if I had actually followed the ingredient list and maybe added some sugar to the mixture.

Doesn

RICOTTA CHOCOLATE CHIP FRITTERS

Makes 15 fritters

Ingredients:

  • 1 pound ricotta cheese
  • ½ cup mini chocolate chips
  • 4 tbsp. all-purpose flour
  • 2 quarts light olive oil
  • Sugar for dusting

This is how my attempt turned out

Instructions:

  1. Mix the ricotta cheese, mini chocolate chips and flour until well combined.
  2. Fill a sauté pan with light olive oil and place over medium high heat.
  3. Using two tablespoons, scoop mixture into individual fritters and place into hot oil.
  4. Let the fritters cook until they are crisp and brown on the outside.
  5. Use a spider to pull them out of the hot oil.
  6. As they cool, coat with sugar.

Hopefully, your attempt at this recipe turns out better than mine. I probably won’t try this again just because I hated smelling like fried food for those two days.

Getting Organized – Kid’s room

In my quest to get my house organized, I knew that I would need to start with one of my boy’s rooms. How did I know I needed to start there, you ask? My first clue was the sore foot I got from stepping on a toy car few weeks ago. The second was the constant morning wail, “I can’t find any socks!” when I know for a fact that both of them have socks in their drawers. The final straw was when I finally uncovered the strange smell coming from my son’s closet…a forgotten sandwich shoved under piles of clothes after his last attempt at cleaning.

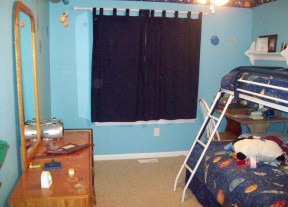
Grant's long narrow room leaving no room to play

So what did this mama do? After praying a very frustrated prayer for patience (and throwing the sandwich away), I got to work. Knowing I would need a clean slate to start with, I took everything, and I mean everything, out of my oldest son’s closet and piled it on his bed. I don’t have a before picture, but let me tell you, it was really bad. I had willingly allowed my kids to color on and put stickers/pictures on their closet walls (I thought it would curb the urge for them to do this to their room walls). My oldest, a packrat in the making, took this a little further by taking weather striping and making roads on his closet walls (that was fun to remove…trust me). After scraping off the stickers and weather striping, I cleaned the walls with damp rag, also cleaning the baseboards, ceiling, and light fixture. Next, I grabbed a can of white flat latex paint and gave the inside of the closet 2 coats of paint. After about 2 hours of cleaning and prepping, I finally had an empty, clean closet to start organizing.

Organized closet

While I was working in Grant’s room, I had decided to get rid of his long dresser and move all his clothes to the closet. This would hopefully make his narrow room seem much larger than it is. With an empty closet and a bed full of clothes, I headed to Target and Lowe’s to explore my closet organization options. At Target I picked up a ClosetMaid 3 Drawer Organizer and Closetmaid Stackable 3 Cube Organizer for about $60.00 and also a few more children’s hangers. I wanted to add more hanging space, so I bought 2 Real Organized Adjustable Closet Rods at Lowe’s for about $8.00 each.
First, I assembled the two ClosetMaid Organizers as directed. Next, my loving husband anchored the bottom drawer to the wall. Unfortunately, this took some time, because there were no wall studs where I wanted the shelves (right in the middle of the closet). Now, I know many of you are asking, why do you need to secure the drawers into studs? Two words… my boys!  I once found my youngest straddling the fireplace mantle and the TV cabinet to retrieve a toy that had been put out of reach as punishment. So trust me when I say, it’s always a smart idea to secure heavy objects, or items that might be used for climbing, to the wall studs.
Another run to the store for a box of wall anchors and 20 minutes later the bottom drawers were successfully anchored to the wall. My husband then added the top shelf organizers, once again anchoring them to the wall. The top shelf that you see was already in place, but it was difficult for my son to reach his clothes. To make clothes more accessible, and add more storage space, we screwed closet rods to the lower half of his closet on both sides. This took two people, lots of measuring, and a small level to get the rods in the exact position we wanted. The last thing I added were a few Command Medium Hooks to the inside of his closet for hanging items such as his backpack, robes, belts, etc…
 I was finally ready to start putting items back in his closet and cleaning out his dresser. Here are some organizing tips that I learned along the way:
      • Delete. Get rid of those clothes your child has grown out of, damaged, or they just won’t wear. Make 3 piles, one to keep, one to donate, and one for trash. I also added a fourth pile, clothes that will go to little brother. Be fierce, keep only what you think your child needs.
      • Hang like items together. You can see from Grant’s closet, his shirts are on one side, and his pants are on the another. I also further organized them by season, use, and color. For example, his long-sleeved shirts (shown on top) are organized by function (school shirts, sweaters, dress shirts) and then by color. This has made it easy for him to find his favorite things. With his pants, I placed the more frequently used jeans on the bottom rod and have his dress slacks on the top.
      • Fold neatly. I know it’s a pain, but well folded clothes make it easier for kids to see what they have. Here are a some great sites if you need help folding clothes:
    • Keep it clean. That’s right, the solution to a clean and organized closet is to…..KEEP IT CLEAN! No more clothes on the floor, writing on the walls, smelly sandwiches, or any other closet disasters you might face. Try to encourage your kids to keep their closet clean and organized (and a little 5 minute help from mom every day doesn’t hurt either).

Grant’s closet has been like this for a few weeks now, and after a few minor mama/son misunderstandings (like your clothes DO NOT belong on the floor!), it’s still looks really good. We did add a small laundry hamper to the corner, but other than that, the closet looks the same. This project took most of the day to complete, so if you decide to do a total closet redo like I did, plan accordingly.

Grant's desk, an organizational nightmare

Next week, I plan to show how I got my little packrat’s desk more organized. Let me know if you have any ideas or suggestions.

What to do with that Blank Wall in your Child’s Bedroom or Playroom

As I’ve mentioned before, we recently moved my son to his “big boy” room.  We tried to do this with as little fuss and chaos as possible, but I also wanted to make him a cute room that he would enjoy. As soon as we found out we were pregnant again, I knew that we would need to move Davis to a bigger bed so the crib would be ready for the next little one.  I scoured the internet looking for children’s bedding, but hit a huge snag. The bed we have moved Davis into is a queen bed.  Do you know how difficult it is to find toddler/children’s bedding for a queen size bed?  Well, it’s not easy at all.  You’re lucky to find a full/queen set appropriate for a toddler, and then you can never find really, really cute matching sheets (because children only sleep in full, twin or toddler beds…right?).

Davis’s bed will serve as an extra guest bed when we have visitors and, for this reason, I want bedding that’s little boy appropriate without being loud and obnoxious. I also wanted to do this as cheaply as possible and for once my procrastination and unwavering ability to never complete a project on time paid off. I found a really cute set at Target (hello 5% discount with your Target Card)!  So, I picked it up at the store and since it was on sale (10%…SCORE!), I also picked up matching wall decals and other items such as lettering and chalkboard decals.  Next came the important paint color and seeing as I’m a paint chemist, this was quite a daunting task.  After a couple of weeks, I finally settled on a main wall color along with an accent wall color. It then took me another couple of weeks to muster up enough energy (hello, first trimester!) and get the room painted.  Around this time, I was once again perusing through Target and stopped by the bedding department to see if they had anything else that matched what I had already purchased.  Much to my surprise, the bedding and all of the accessories I purchased a month before were now on clearance for over 50% off!!  See I told you, my procrastination and indecisiveness finally paid off.  So, I rushed home, returned what I had bought and repurchased everything (plus a lamp!) and paid half of what I had originally!  DOUBLE SCORE!

Davis has been in his new room for about 3 months now and he loves it.  He talks about the cars and trucks on his walls/bedding all the time!  The only issue in his room was this huge blank wall.  It was the longest, bluest, uninterrupted space in his room and it left me baffled.  Also, I kept having a situation with art projects piling up around my house.  Davis goes to an amazing daycare center and he comes home almost every day with some sort of drawing or other work of art.  I have grand ideas of taking pictures of his art and making books with Shutterfly, but honestly most of his art work resembles big blobs.  Don’t get me wrong, they are glorious and pretty much rival Picasso’s’ work, they just don’t photograph well. So, I came up with a solution to both of my problems – a Masterpiece Display!

Supplies Needed:

1:   I started by purchasing a simple picture hanging kit at Target.  It was ~$1.50.  Make sure it includes picture hanging wire and eye hooks.  If you want to go for a softer look, you can also use yarn or twine. I chose the wire to maintain the industrial look of the cars and trucks theme.

2:   I also purchased clothespins in two sizes from Hobby Lobby (they are in the craft wood section).

3:   I had already purchased some water-based acrylic paint from hobby lobby to paint some wood shelves for his room so I used that paint to dye the clothespins.

What to do: 

1: I mixed the paint with some water (make enough to completely cover the pins) in a kitchen bowl.  I allowed these to soak for about 8 hours but you can soak them for longer or add more paint to your mixture if you want a stronger color on your clothespins.  I then placed the pins on cooling rack to completely dry (overnight).

2:  I hung the picture wire using the screw eye hooks, about 12 inches from the ceiling and 1.5 feet from the end of the wall on both sides.  A laser level came in very handy when trying to do this.

3:  Then, I hung the wire between the two hooks rather tightly (it will bow when you add pictures to it).

4:  I also decided to us leftover lettering from my earlier bedding purchase to create a cute header.  I chose “My Creations” but other ideas are: “Works of Art”, “Masterpieces”, “Look What I Did” or something similar.

5:  Finally, I picked my favorite art pieces and hung them up, securing them with the dyed clothespins.

Voila!  No more empty wall and a creative, inexpensive way to display my little Picasso’s artwork! Try this in your little artist’s room. They will beam with pride as they show off their works of art!

Adventures in Cooking – Week 2

Since week 1 of my New Year’s Resolution was a success, I was really looking forward to the recipe I had chosen for this week’s post. I’ve always wanted to use tofu in a recipe, but I never came across a recipe that sounded good to me. I was once again browsing through recipes on Pinterest and I came across one that seemed easy to make and delicious. This recipe for Tofu with Roasted Chili Paste came from the Rachel Cooks Thai blog. I decided to change it up a bit, because I couldn’t find the exact paste that she used. The closest I could find at my store was red curry paste. Also, I didn’t have any rice at home so I decided to use noodles. I really like to add vegetables to my dishes, and green peppers just seemed right with this dish. Keep in mind that you will probably have to open some windows or doors when you cook this, since the smell was quite strong in my apartment and lasted a couple of days.

I will say that this recipe kept me on my toes. Some of the red curry paste got on the burner and produced minor flames (I’m okay!), and I accidentally burned the garlic the first time so I had to start over.  Again, I would like to reiterate that I have never been a good cook and this weekly exercise is to try new foods and to become more comfortable in the kitchen.

This is how it's supposed to look!

Tofu with Roasted Chili Paste

Makes 2-3 servings

Ingredients:

  • 1 14-ounce block of firm tofu
  • 3-4 cloves garlic, chopped
  • 2 green onions, sliced thinly
  • 2 Tablespoons roasted chili paste (nam prik pao)
  • Canola oil
  • Jasmine rice

Instructions:

  1. Cut the tofu into medium-sized rectangles and blot dry on paper towels.
  2. Saute the garlic in canola oil over medium high heat.  When it’s almost golden brown, add the roasted chili paste and sauté for a few seconds longer.
  3. Then add the tofu and coat well with the chili and garlic.  Cook until the tofu is golden brown and the chili and garlic have formed a slight crust on the outside.
  4. Add green onions, cook for a second longer, and then take off the heat.  Serve with jasmine rice.

This is how my attempt turned out.

Tory’s Tofu with Red Curry Paste and Noodles

Makes 2 servings

Ingredients:

  • 1 14-ounce block of firm tofu
  • 3-4 cloves of garlic, chopped finely
  • 2 green onions, sliced thinly
  • 1 green pepper, sliced thinly (julienne)
  • 2 Tablespoons red curry paste
  • Canola oil
  • Asian noodles

Instructions:

  1. Prepare Asian noodles as directed on package.
  2. Meanwhile, cut the tofu into medium-sized rectangles and blot dry on paper towels.
  3. Saute the garlic in canola oil over medium high heat. When it’s almost golden brown, add the red curry paste and saute for a few seconds longer.
  4. Then add the tofu and coat well with curry and garlic. Add green peppers. Cook until the tofu is golden brown and green peppers are slightly tender.
  5. Add green onions, cook for about 30 seconds, and take off heat. Serve over asian noodles.

Although there were some minor mishaps, I was pretty happy with how this turned out.  If you’re in the mood to try something new, different, and a little spicy, I would definitely recommend this recipe.  Do you guys have any favorite recipes using tofu?

Get your CRAFT on!

In my house, EVERYTHING is about being a boy! Going to ball games, fixing cars, monster trucks, digging in the dirt, loud noises, sports, wrestling around, weird smells, climbing, and all over boy silliness is the norm in my house. I’m not saying my boys can’t be the sweetest things when they want to be, but being the only female among these manly men can be difficult at times. That’s when I get my craft on! Yesterday just happened to be one of those days. I had worked a couple of night shifts, and came home to find my house a little messier than usual. I looked at all the toys on the floor, breakfast dishes on the table, pajamas hanging from doorknobs, and turned myself right back around and got back in my car. Sure I was tired, but at that point, only a craft project would do. So off I drove to gather my supplies. A few hours later, this is what I had created.

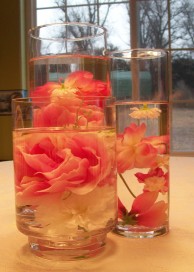
Floating Flower Arrangement

Beautiful centerpiece

Supplies: Bouquet of flowers, empty glass vases/candle holders (I used clear), water

Cost: $5 for flowers. Glass vases/candle holders run between $4-$6 depending on size, but I just used what I had around the house.

Directions: Place flowers in vases, placing blooms up (I just popped the blooms off the bouquet I bought, no cutting required). Fill vases with water, leaving space at top. You can then rearrange flowers for appearance. Wipe vase top (inside and out) with cloth to remove any water marks.

Voila! You’re done. So simple and easy, I’m sure it will make a wonderful centerpiece for your table!

Valentine Wreath

Supplies

Supplies: 5 Heavy duty paper plates (10 1/16in), pink ribbon, scissors, glue gun, and 1 spool each of red, pink, and white 6inX25yd Tulle (I found mine at Wal-Mart in the ribbon section)

Cost: Heavy duty paper plates $3.47 for pack of 50 (35 cents for 5 plates), pink ribbon $1 (clearance!), Tulle $2.47 each spool ($7.41 for all three. Total cost = $8.76 +tax

Directions:

Take a paper plate and puncture a hole in center. Then cut an X in the middle, up to the sides.

Center of plate cut

Next, cut around the inside of the plate, so you only have the outer edge as a ring. Repeat this for all 5 plates. Stack paper plates together.

Left with only a paper plate ring

Next, you will add the tulle. I cut each color of tulle in 14in pieces (you can estimate or measure with ruler…whatever you’re most comfortable with), cutting each piece as I went. I found it easier to cut as I went, rather than cutting all the tulle at once. Also, it kept my tulle nice and neat on the spools.  To add the tulle to my paper wreath, I just tied a knot, pulling it taut, and then double knotted it. I used at red, white, pink pattern, but you can use whatever pattern is best for you.

Knotting the tulle

After you tie a piece, you will want to slide it next to your other pieces. Remember to push your tulle pieces tightly together, so that it covers the entire plate. Also, I made sure the knots were evenly placed (I put mine right at the edge of my plate).

Tightly gathered tulle

Keep adding your tulle until you wreath is full. This took me about 1 1/2 hours to do, so allow for plenty of time. Next, cut a 10 in piece of ribbon and tie the ends together with a double knot. Flip the wreath on its back. Separate a few of pieces and add a small amount of hot glue. Next, put the ribbon knot on the hot glue (careful not to burn any fingers). Let it dry slightly then push your tulle together.

Glued ribbon

Your done! Now hang your wreath on your front door and enjoy!

Valentine's Wreath

I hope you enjoyed getting your craft on. Remember, you don’t have to use these Valentine’s day colors. Any colors you use will look great! Let me know how your projects turned out. I would love to see your creations.