What to do with that Blank Wall in your Child’s Bedroom or Playroom

As I’ve mentioned before, we recently moved my son to his “big boy” room.  We tried to do this with as little fuss and chaos as possible, but I also wanted to make him a cute room that he would enjoy. As soon as we found out we were pregnant again, I knew that we would need to move Davis to a bigger bed so the crib would be ready for the next little one.  I scoured the internet looking for children’s bedding, but hit a huge snag. The bed we have moved Davis into is a queen bed.  Do you know how difficult it is to find toddler/children’s bedding for a queen size bed?  Well, it’s not easy at all.  You’re lucky to find a full/queen set appropriate for a toddler, and then you can never find really, really cute matching sheets (because children only sleep in full, twin or toddler beds…right?).

Davis’s bed will serve as an extra guest bed when we have visitors and, for this reason, I want bedding that’s little boy appropriate without being loud and obnoxious. I also wanted to do this as cheaply as possible and for once my procrastination and unwavering ability to never complete a project on time paid off. I found a really cute set at Target (hello 5% discount with your Target Card)!  So, I picked it up at the store and since it was on sale (10%…SCORE!), I also picked up matching wall decals and other items such as lettering and chalkboard decals.  Next came the important paint color and seeing as I’m a paint chemist, this was quite a daunting task.  After a couple of weeks, I finally settled on a main wall color along with an accent wall color. It then took me another couple of weeks to muster up enough energy (hello, first trimester!) and get the room painted.  Around this time, I was once again perusing through Target and stopped by the bedding department to see if they had anything else that matched what I had already purchased.  Much to my surprise, the bedding and all of the accessories I purchased a month before were now on clearance for over 50% off!!  See I told you, my procrastination and indecisiveness finally paid off.  So, I rushed home, returned what I had bought and repurchased everything (plus a lamp!) and paid half of what I had originally!  DOUBLE SCORE!

Davis has been in his new room for about 3 months now and he loves it.  He talks about the cars and trucks on his walls/bedding all the time!  The only issue in his room was this huge blank wall.  It was the longest, bluest, uninterrupted space in his room and it left me baffled.  Also, I kept having a situation with art projects piling up around my house.  Davis goes to an amazing daycare center and he comes home almost every day with some sort of drawing or other work of art.  I have grand ideas of taking pictures of his art and making books with Shutterfly, but honestly most of his art work resembles big blobs.  Don’t get me wrong, they are glorious and pretty much rival Picasso’s’ work, they just don’t photograph well. So, I came up with a solution to both of my problems – a Masterpiece Display!

Supplies Needed:

1:   I started by purchasing a simple picture hanging kit at Target.  It was ~$1.50.  Make sure it includes picture hanging wire and eye hooks.  If you want to go for a softer look, you can also use yarn or twine. I chose the wire to maintain the industrial look of the cars and trucks theme.

2:   I also purchased clothespins in two sizes from Hobby Lobby (they are in the craft wood section).

3:   I had already purchased some water-based acrylic paint from hobby lobby to paint some wood shelves for his room so I used that paint to dye the clothespins.

What to do: 

1: I mixed the paint with some water (make enough to completely cover the pins) in a kitchen bowl.  I allowed these to soak for about 8 hours but you can soak them for longer or add more paint to your mixture if you want a stronger color on your clothespins.  I then placed the pins on cooling rack to completely dry (overnight).

2:  I hung the picture wire using the screw eye hooks, about 12 inches from the ceiling and 1.5 feet from the end of the wall on both sides.  A laser level came in very handy when trying to do this.

3:  Then, I hung the wire between the two hooks rather tightly (it will bow when you add pictures to it).

4:  I also decided to us leftover lettering from my earlier bedding purchase to create a cute header.  I chose “My Creations” but other ideas are: “Works of Art”, “Masterpieces”, “Look What I Did” or something similar.

5:  Finally, I picked my favorite art pieces and hung them up, securing them with the dyed clothespins.

Voila!  No more empty wall and a creative, inexpensive way to display my little Picasso’s artwork! Try this in your little artist’s room. They will beam with pride as they show off their works of art!

Get your CRAFT on!

In my house, EVERYTHING is about being a boy! Going to ball games, fixing cars, monster trucks, digging in the dirt, loud noises, sports, wrestling around, weird smells, climbing, and all over boy silliness is the norm in my house. I’m not saying my boys can’t be the sweetest things when they want to be, but being the only female among these manly men can be difficult at times. That’s when I get my craft on! Yesterday just happened to be one of those days. I had worked a couple of night shifts, and came home to find my house a little messier than usual. I looked at all the toys on the floor, breakfast dishes on the table, pajamas hanging from doorknobs, and turned myself right back around and got back in my car. Sure I was tired, but at that point, only a craft project would do. So off I drove to gather my supplies. A few hours later, this is what I had created.

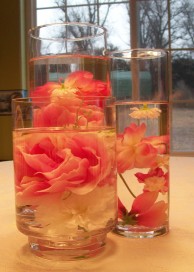
Floating Flower Arrangement

Beautiful centerpiece

Supplies: Bouquet of flowers, empty glass vases/candle holders (I used clear), water

Cost: $5 for flowers. Glass vases/candle holders run between $4-$6 depending on size, but I just used what I had around the house.

Directions: Place flowers in vases, placing blooms up (I just popped the blooms off the bouquet I bought, no cutting required). Fill vases with water, leaving space at top. You can then rearrange flowers for appearance. Wipe vase top (inside and out) with cloth to remove any water marks.

Voila! You’re done. So simple and easy, I’m sure it will make a wonderful centerpiece for your table!

Valentine Wreath

Supplies

Supplies: 5 Heavy duty paper plates (10 1/16in), pink ribbon, scissors, glue gun, and 1 spool each of red, pink, and white 6inX25yd Tulle (I found mine at Wal-Mart in the ribbon section)

Cost: Heavy duty paper plates $3.47 for pack of 50 (35 cents for 5 plates), pink ribbon $1 (clearance!), Tulle $2.47 each spool ($7.41 for all three. Total cost = $8.76 +tax

Directions:

Take a paper plate and puncture a hole in center. Then cut an X in the middle, up to the sides.

Center of plate cut

Next, cut around the inside of the plate, so you only have the outer edge as a ring. Repeat this for all 5 plates. Stack paper plates together.

Left with only a paper plate ring

Next, you will add the tulle. I cut each color of tulle in 14in pieces (you can estimate or measure with ruler…whatever you’re most comfortable with), cutting each piece as I went. I found it easier to cut as I went, rather than cutting all the tulle at once. Also, it kept my tulle nice and neat on the spools.  To add the tulle to my paper wreath, I just tied a knot, pulling it taut, and then double knotted it. I used at red, white, pink pattern, but you can use whatever pattern is best for you.

Knotting the tulle

After you tie a piece, you will want to slide it next to your other pieces. Remember to push your tulle pieces tightly together, so that it covers the entire plate. Also, I made sure the knots were evenly placed (I put mine right at the edge of my plate).

Tightly gathered tulle

Keep adding your tulle until you wreath is full. This took me about 1 1/2 hours to do, so allow for plenty of time. Next, cut a 10 in piece of ribbon and tie the ends together with a double knot. Flip the wreath on its back. Separate a few of pieces and add a small amount of hot glue. Next, put the ribbon knot on the hot glue (careful not to burn any fingers). Let it dry slightly then push your tulle together.

Glued ribbon

Your done! Now hang your wreath on your front door and enjoy!

Valentine's Wreath

I hope you enjoyed getting your craft on. Remember, you don’t have to use these Valentine’s day colors. Any colors you use will look great! Let me know how your projects turned out. I would love to see your creations.

You Are Blessed

Yesterday marked an important day for a very special person in my family…Happy Birthday Mema! Now, my mother-in-law, or Mema to my children, is one of the most Godly women I have ever known. To me, she is an example of a Proverbs 31 woman. She is always helping her family and friends and ever striving to make those around her feel cherished and welcome. If you could witness one of our big family dinners you would see what I am talking about. Somehow she manages to cook a fantastic meal, visit with her children, romp around on the floor with her grandkids, help with bathing and bedtime, read loads of books, and still have her hair and make-up look great!  Proverbs 31:28 states “Her sons rise up and call her blessed.” I know this is true of my mother-in-law because I am lucky enough to be married to her only son.

My own Godly mother always gave me wonderful dating advice and, thankfully, I finally listened to her when I met my husband. “Hilary” my mom said, “never marry a man who disrespects his mother, because if he can’t love his own mother, he will never know how to love you.” At that time, I took the advice, but didn’t really understand the true meaning behind the statement. As a mother of two small boys, I finally understand that in teaching them how to love and respect myself and others, I am also teaching them how to love and respect their future wives. Wow! It’s almost too overwhelming for this mama. Truly, I am blessed to have a mother-in-law who taught her children the meaning of love and respect, and most importantly, that these things can only come from a relationship with Christ. I am blessed that my mother-in-law, no matter how knowingly or unknowingly, raised my husband to be Godly man who loves and respects his mother and, therefore, loves and respects me.

So when faced with what to get my mother-in-law for her birthday, I began to worry,  progressed to fidgeting, and then I really start to panic. Ahhhh! What do I get a woman who was blessing me before she met even me? After about 5 minutes of panicking (okay, it might have been a day or two), I decided to make something for her newly remodeled kitchen/hallway/dining room. I wanted to give her something to hang on the wall that she would cherish every time she saw it. So, an idea began to form. Before I knew it, I was making a plaque of her grandchildren especially for her.

Supplies

The first thing I did was gather some supplies.

1. Flat piece of craft board from a craft supply store (size depends on size your project. Here I used a 8in x 36in board). This cost me about $7.00

2. Two complimentary acrylic paints (I used black and white)

3. Paintbrushes

4. A glue gun and glue sticks

5. Clothespins (I just pulled mine off the line). Make sure you have enough for each grandchild and add a few for any future grandbabies

6. Ribbon for hanging (I used clothesline to go with my theme)

7. Pictures of grandchildren

8. Paint marker (white with a medium tip)

9. Coarse sandpaper

To begin, I covered my work surface with newspaper and laid my supplies out. Next, I painted the board white on one side as well as all four sides of the board.

Crafter’s Tip: Make sure you lift the board off the paper after it has dried a little and move it over, or it will stick to your paper. You can also elevate the board using paper cups or other similar disposable items.

After applying a good base coat, I let the paint completely dry (about 45 minutes). While the base coat is drying, you can start working on the clothespins. I added a little water to some white paint on a paper plate to make a whitewash effect.  I then painted each clothes pin one by one, let the paint sit for about 30 seconds, then wiped them with a clean rag. I think they turned out pretty cute, don’t you?

White-washed clothespins

Next, I covered the white board with coat of black paint and let this dry. This took about an hour to completely dry. I took coarse sandpaper, and rubbed the wood, ALONG the grain, to give the plaque an aged, shabby, chic feel I was going for.

Gently sand the black to expose the white underneath

I took the clothespins and lined them up neatly on the bottom of my board. If you want to measure your clothespins out with a measuring tape, you can, but I chose to just eyeball it. When I had placed the clothespins where I wanted them, I placed a small dab of hot glue at the top of each pin, and glued it to the board.

Clothespins attached to board

After letting the clothespins dry, I started writing my letters on the board. Now, if you don’t feel comfortable writing your own letters, please feel free to use stencils. Here’s a link if you need help http://www.ehow.com/how_7638788_stencil-letters-wall.html. You can usually pick stencils up at any craft store or order them online for a fairly reasonable price. I wanted a more handmade look, so freehand was perfect for me. One trick that I have learned is to write my letters how I want them on a piece of paper directly above my work. This helps serves as a template to guide my font and spacing as I write. Also, you can see that I personalized the plaque by adding my parents-in-laws names. To personalize your own plaque you can add other decorations such as your kids handprints, a drawing of a stick-figure family, flowers, etc… What ideas do you have to personalize your Grandchildren plaque?

Finally, I glued my piece of clothesline (or ribbon) to the back of the plaque and add my pictures.

Grandchildren: Grandparents are proud of their grandchildren, as children are proud of parents Proverbs 17:6


Personally, I think it turned out really cute, don’t you? I gave it to my mother-in-law last night and she really seemed to love it. So, if you have a parent or grandparent who has been a blessing in your life, why not make them a Grandchildren plaque. Let them know you call them blessed.

Welcome

This blog is an inspirational blog that allows us, as sisters, to express ourselves through God, crafts, and just our daily experiences of work, family, and friends. Each one of us is unique in our own ways and we are all in different walks of life right now, but the bond that we have as sisters will always be there.

The oldest, Hilary, has a family of four along with a nursing career that challenges her every time she walks through the door. Raising two boys has its challenges, but she makes it seem easy. Number two, Tory, is a dedicated business girl working in a big city. She is an independent soul with a creative mind that is expressed through her amazing knitting skills. Never underestimate a women with needles. The third, Emily, is a chemist raising a toddler with another special bundle on the way. Multitasking is an art with this one. That leaves the baby, Katie, who has recently graduated from college and is just trying to find the right path God is leading her too.

We just want to say thank you for taking the time to check out our little blog and ask that you to be patient with us. As stated before, we are all in different walks of life so it may take time to get this up and going; however, we promise that since this is a reflection of our crazy lives, you are not going to want to miss one thing!

God Bless,

The 4 Sisters